Saturday, June 25, 2022

Y Size Limit of the MK3S

In an earlier post, I wrote about splitting large gears into parts to print them on a Prusa MK3S. My current project includes a gear which is strictly larger than the official size of the print bed, but by using a trick you can still make it work.

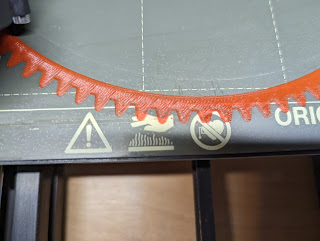
The gear is 281.33mm in the Y direction from tooth tip to tooth tip. The Prusa MK3S print bed is 250x210mm. However, you can go beyond these limits. First, in the PrusaSlicer printer setting, change the bed size to 250x230mm with an origin offset of 10mm in Y, 10mm being half the difference 230 and 210. Now load the model, move it until it is within the printable area and slice it, with skirt turned off. If you just go ahead and print it, the printer may come up against its Y limits. Nothing terrible happens at this point. You can hear a slight "clunk" as it reaches the limit, and the print it truncated, like this:


The trick is now to adjust the Y position of the model so that we minimize the truncation at both top and bottom. I found that for this model, 103.5mm was the best compromise, leading to a very small amount of truncation:


This is probably OK as the very tips of the gear teeth are not doing much.

Note that you have to peel off the pressure release strip as soon as it has printed, otherwise the print overlaps it.

This looks to be about the limit of what is achievable. With a slightly smaller model you could avoid any truncation at all while still exceeding the official limits. I guess 217mm would be OK.

Sunday, June 05, 2022

Swingtime update

In my previous post about the Swingtime clock, I noted that the remontoire occasionally goes mad. The motor keeps running until the motor arm collides with the third wheel, long after the tilt switch should have turned it off. I was using a miniature tilt switch of the sort that has two metal balls inside it (like this). I replaced the component I used at first with a second one and got the same result after a day or so of running the clock. The original design called for a mercury tilt switch (like this) and so I replaced it with this one from Amazon. It's a little big for the compartment in the motor arm, but I found that if you open up the plastic package, the actual switch is only about a third of the size. I mounted it and the capacitor on a small piece of veroboard:

(I know its hard to see. You get the idea and the scale.)

It's too early to say whether this works better. However, I've run it for more than a day with no signs of problems. With the original tilt switch, even before the overrun and crash into the third wheel, I would sometimes see it running for longer than expected, and I have not noticed that happening at all with the new switch.

One problem remains with the clock: it occasionally squeaks. It is always on certain teeth of the escapement, though it does not squeak every time. Some polishing or lubrication should help. To find when it is happening, I've been taking video at 1/8 speed. Here is an example:

Update: after further examination, I think there was more than one source of the squeaking. It got less when I polished the tips of the escapement, and then went away completely after I lubricated the escape wheel arbor. (For now, at least...)